
Updating DNS records in cPanel is an essential task for managing your domain’s settings and ensuring proper domain resolution. DNS (Domain Name System) records translate domain names into IP addresses, directing traffic to the correct server. Whether you need to point your domain to a new hosting provider, set up subdomains, or configure email services, understanding how to update DNS records in cPanel is crucial. In this comprehensive guide, we’ll walk through the process of updating DNS records in cPanel, including common record types and best practices.
Understanding DNS Records:
DNS records contain information about how domain names should be mapped to IP addresses and other services. Common types of DNS records include:
- A Record (Address Record): Maps a domain name to an IPv4 address.
- AAAA Record (IPv6 Address Record): Maps a domain name to an IPv6 address.
- CNAME Record (Canonical Name Record): Alias of one domain name to another.
- MX Record (Mail Exchange Record): Specifies the mail server responsible for receiving email on behalf of the domain.
- TXT Record (Text Record): Stores text-based information, often used for SPF (Sender Policy Framework) and DKIM (DomainKeys Identified Mail) records.
- NS Record (Name Server Record): Specifies the authoritative name servers for the domain.
Steps to Update DNS Records in cPanel:

1. Access cPanel:
- Log in to your cPanel account using your credentials. The login URL is typically
https://yourdomain.com/cpanel, where “yourdomain.com” is replaced with your actual domain name.
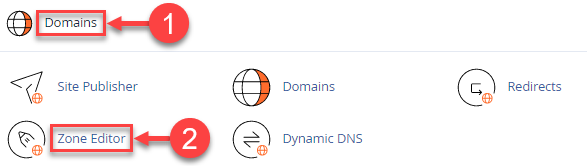
2. Navigate to DNS Zone Editor:
- Once logged in, locate the “Domains” or “Advanced” section in cPanel and click on the “DNS Zone Editor” icon. This will open the DNS Zone Editor interface.
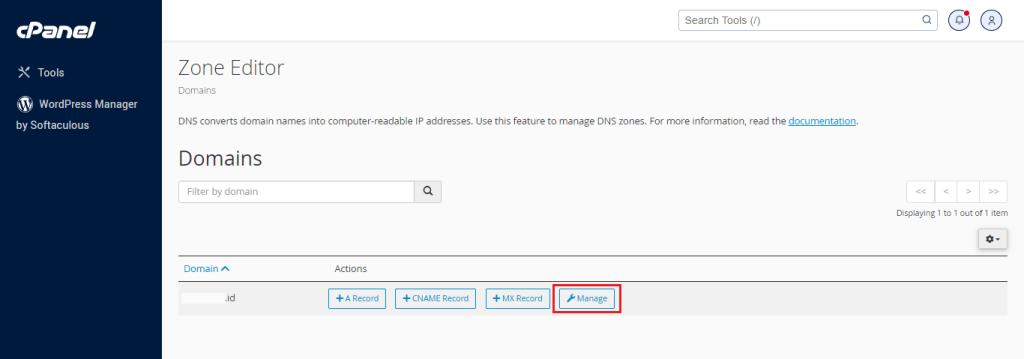
3. Select Domain:
- From the drop-down menu, select the domain for which you want to update DNS records. If you have multiple domains associated with your cPanel account, choose the appropriate domain.
4. Add or Modify DNS Records:
- To add a new DNS record, click on the “Add Record” button and choose the desired record type from the drop-down menu. Enter the necessary information, such as the record name, TTL (Time to Live), and destination value.
- To modify an existing DNS record, locate the record in the list and click on the “Edit” button. Make the necessary changes to the record’s values and click “Save” to update the record.
5. Delete DNS Records (Optional):
- If you need to remove a DNS record, locate the record in the list and click on the “Delete” button. Confirm the deletion when prompted.
6. Verify Changes:
- After making changes to your DNS records, it’s essential to verify that the changes have been applied correctly. You can use online DNS lookup tools or command-line utilities like
nslookupordigto check the updated records.
Best Practices for Updating DNS Records:
1. Understand Record Types:
- Familiarize yourself with different types of DNS records and their purposes to ensure you’re updating the correct records for your needs.
2. Keep Records Accurate:
- Regularly review and update DNS records as needed to reflect changes in your domain’s configuration, such as server migrations or service providers.
3. Use Short TTL Values for Testing:
- When making changes to DNS records, set a short TTL value (e.g., 300 seconds) temporarily to expedite propagation and allow for testing. Once verified, you can revert to a longer TTL.
4. Document Changes:
- Maintain documentation of DNS changes, including the purpose of each record and the date of modification, to track changes and troubleshoot issues if necessary.
5. Monitor Propagation:
- Be aware that DNS changes may take some time to propagate globally. Monitor propagation using online tools and be patient while waiting for changes to take effect.
6. Backup DNS Configuration:
- Regularly backup your DNS configuration to avoid data loss and simplify recovery in case of accidental changes or system failures.
Conclusion:
Updating DNS records in cPanel is a straightforward process that allows you to manage your domain’s settings and ensure proper domain resolution. By following the steps outlined in this guide and adhering to best practices, you can effectively update DNS records to reflect changes in your domain’s configuration, improve security, and optimize performance. Whether you’re configuring email services, setting up subdomains, or pointing your domain to a new server, understanding how to update DNS records in cPanel is essential for maintaining a reliable online presence.