Changing your cPanel password is an important step in maintaining the security of your web hosting account. Whether you’ve forgotten your password or simply want to enhance your account’s security, this guide will walk you through the process of changing your cPanel password step by step.
Why Change Your cPanel Password?
- Security: Regularly updating your password helps protect your account from unauthorized access.
- Forgotten Password: If you can’t remember your password, changing it will regain your access.
- Compromised Account: If you suspect that your account has been compromised, changing the password is crucial.
Steps to Change Your cPanel Password
Step 1: Log into Your cPanel Account
- Access Your cPanel: Open your web browser and enter your cPanel URL. This is typically in the format
https://yourdomain.com/cpanelorhttps://yourserverip:2083. - Enter Your Credentials: Input your existing username and password to log in.
Step 2: Locate the Password Change Option
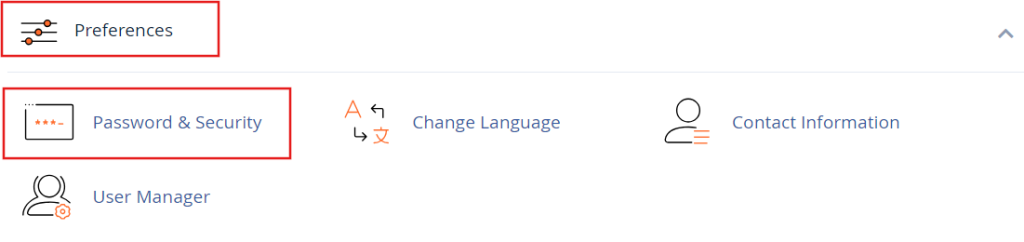
- Find the Preferences Section: Once logged in, look for the “Preferences” section on the cPanel dashboard.
- Select Change Password: Click on the “Change Password” option. This will open a new page where you can enter your new password.
Step 3: Choose a Strong Password
- Password Criteria: A strong password should be at least 12 characters long, combining uppercase and lowercase letters, numbers, and special characters. Avoid easily guessable information like birthdays or common words.
- Use a Password Manager: Consider using a password manager to generate and store complex passwords. This adds an additional layer of security.
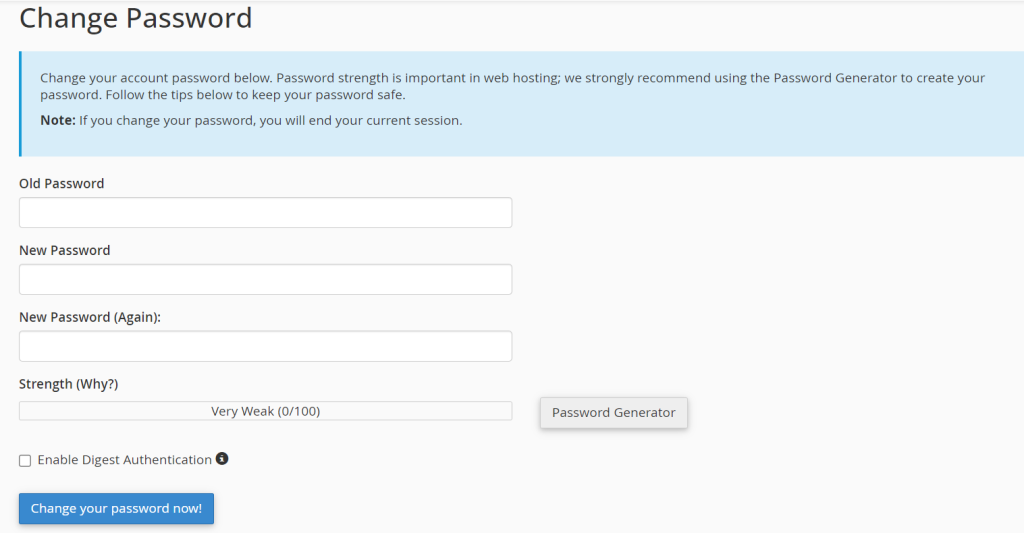
Step 4: Enter Your New Password
- Current Password: You will be prompted to enter your current password first.
- New Password: Enter your new password in the designated field.
- Confirm New Password: Type the new password again in the confirmation field to ensure there are no typos.
Step 5: Save Changes
- Click on Change Password: After filling out the necessary fields, click on the “Change Password” button.
- Success Message: If your password change is successful, you will receive a confirmation message indicating that your password has been updated.
Step 6: Log Out and Test Your New Password
- Log Out: To ensure that your new password works, log out of your cPanel account.
- Log In Again: Use your new password to log back in. If you can access your account, your password change was successful.
Additional Tips for cPanel Security
- Two-Factor Authentication: If your hosting provider offers two-factor authentication (2FA), enable it for an extra layer of security. This typically involves receiving a code on your mobile device that you must enter along with your password.
- Regular Updates: Change your password periodically, especially if you share access with others.
- Monitor Account Activity: Regularly check for any unauthorized access or changes in your cPanel account.
Troubleshooting
- Forgotten Password: If you’ve forgotten your current password, you can reset it using the “Forgot Password” link often provided by your hosting provider’s login page.
- Contact Support: If you encounter issues during the password change process or cannot log in, reach out to your hosting provider’s customer support for assistance.
Conclusion
Changing your cPanel password is a straightforward process that significantly enhances the security of your cPanel web hosting account. By following the steps outlined in this guide, you can easily update your password whenever necessary. Remember to choose a strong password, enable two-factor authentication, and keep an eye on your account activity to safeguard your online presence. Regularly updating your password will go a long way in protecting your data and ensuring a secure hosting environment.